
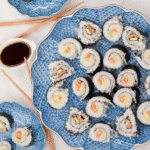
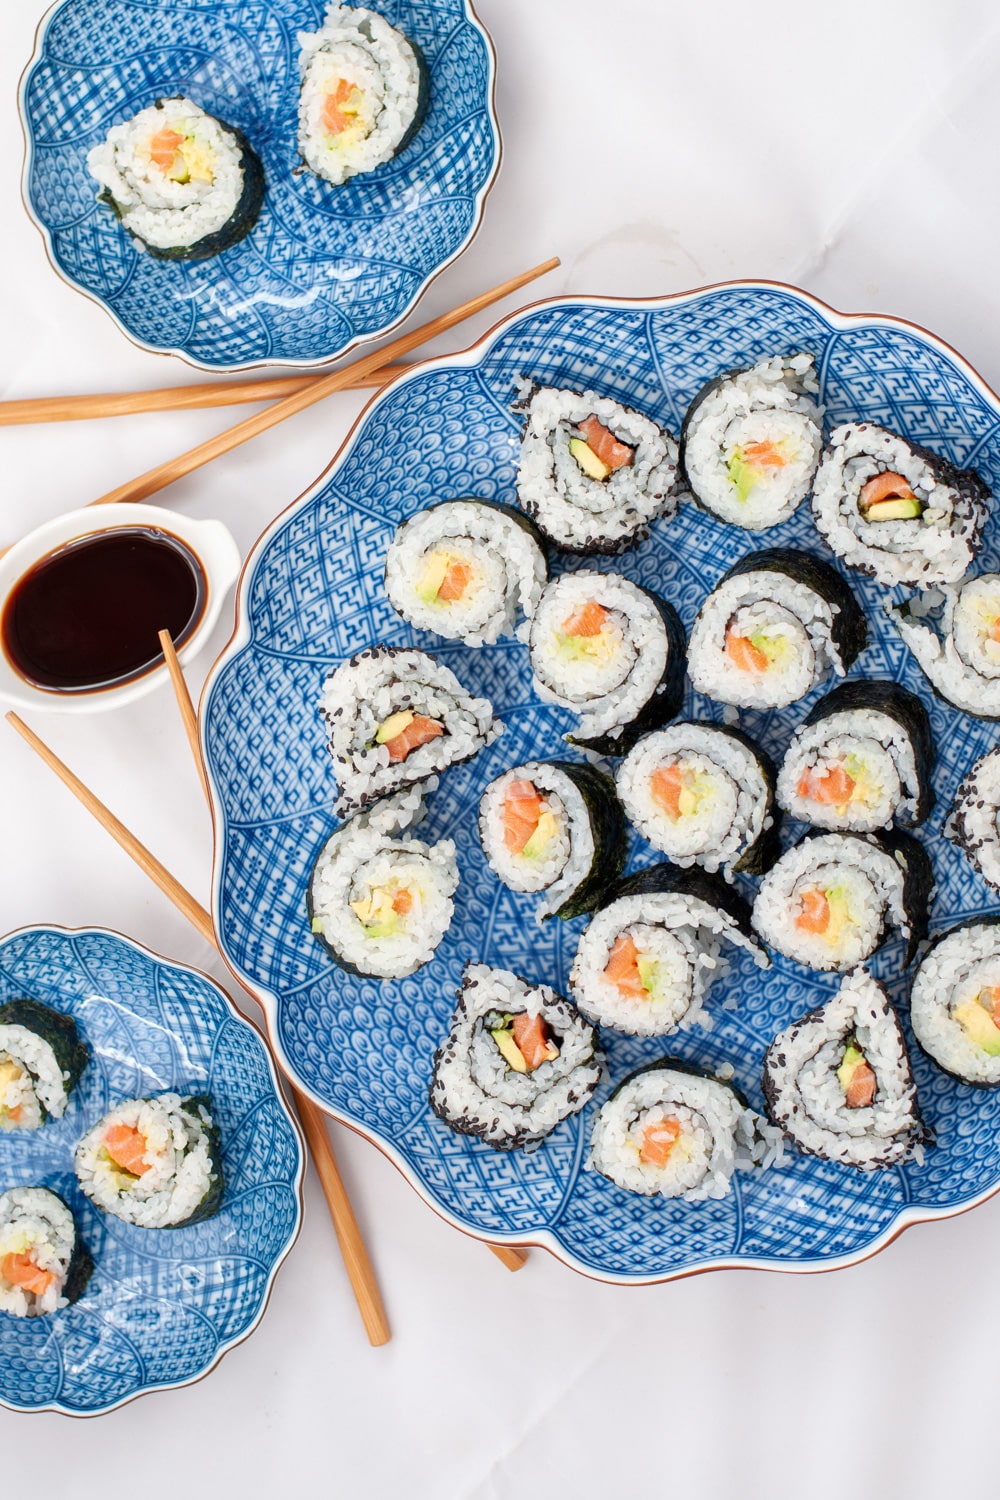
Maki and Uramaki Sushi Recipes are much better when made at home. You can fill them with more salmon than bought in the store or restaurant. While the maki is sushi wrapped in nori seaweed, the Uramaki has the seaweed inside the roll and is coated with sesame seeds. You will learn to make a thin layer of rice easily without getting it stuck into the mat and your fingers. You will never buy sushi at the store again.
Jump to:
- Why Homemade is better
- What are the different types of Sushi
- How to buy fish to make sushi
- Ingredients to make Sushi Rice
- Making the Sushi Rice
- Preparing the fillings
- Making Maki Sushi Rolls
- Making Uramaki Sushi
- Tips for making the best Maki Uramaki Sushi Recipes
- Recipes you might also like
- 📋Maki and Uramaki Sushi Rolls Recipe
Why Homemade is better
As we like Sushi with plenty of salmon, I always prefer to make it home.
You can make triple the amount you can buy for the same budget, often mixed with a less nice piece of fish.
For example, California Rolls are often made with fake Crabsticks.
I am horrified when I see that, wondering what is in that mix.
So better be safe and make it at home. It is very easy, and I will walk you through all you need to know.
What are the different types of Sushi
First of all, let's clarify the names:
Maki is sushi rolled with the seaweeds outside, Uramaki in Japanese means inside out, meaning the seaweed is inside the roll. Nigiri is made only with rice and fish, and Sashimi is the fish.

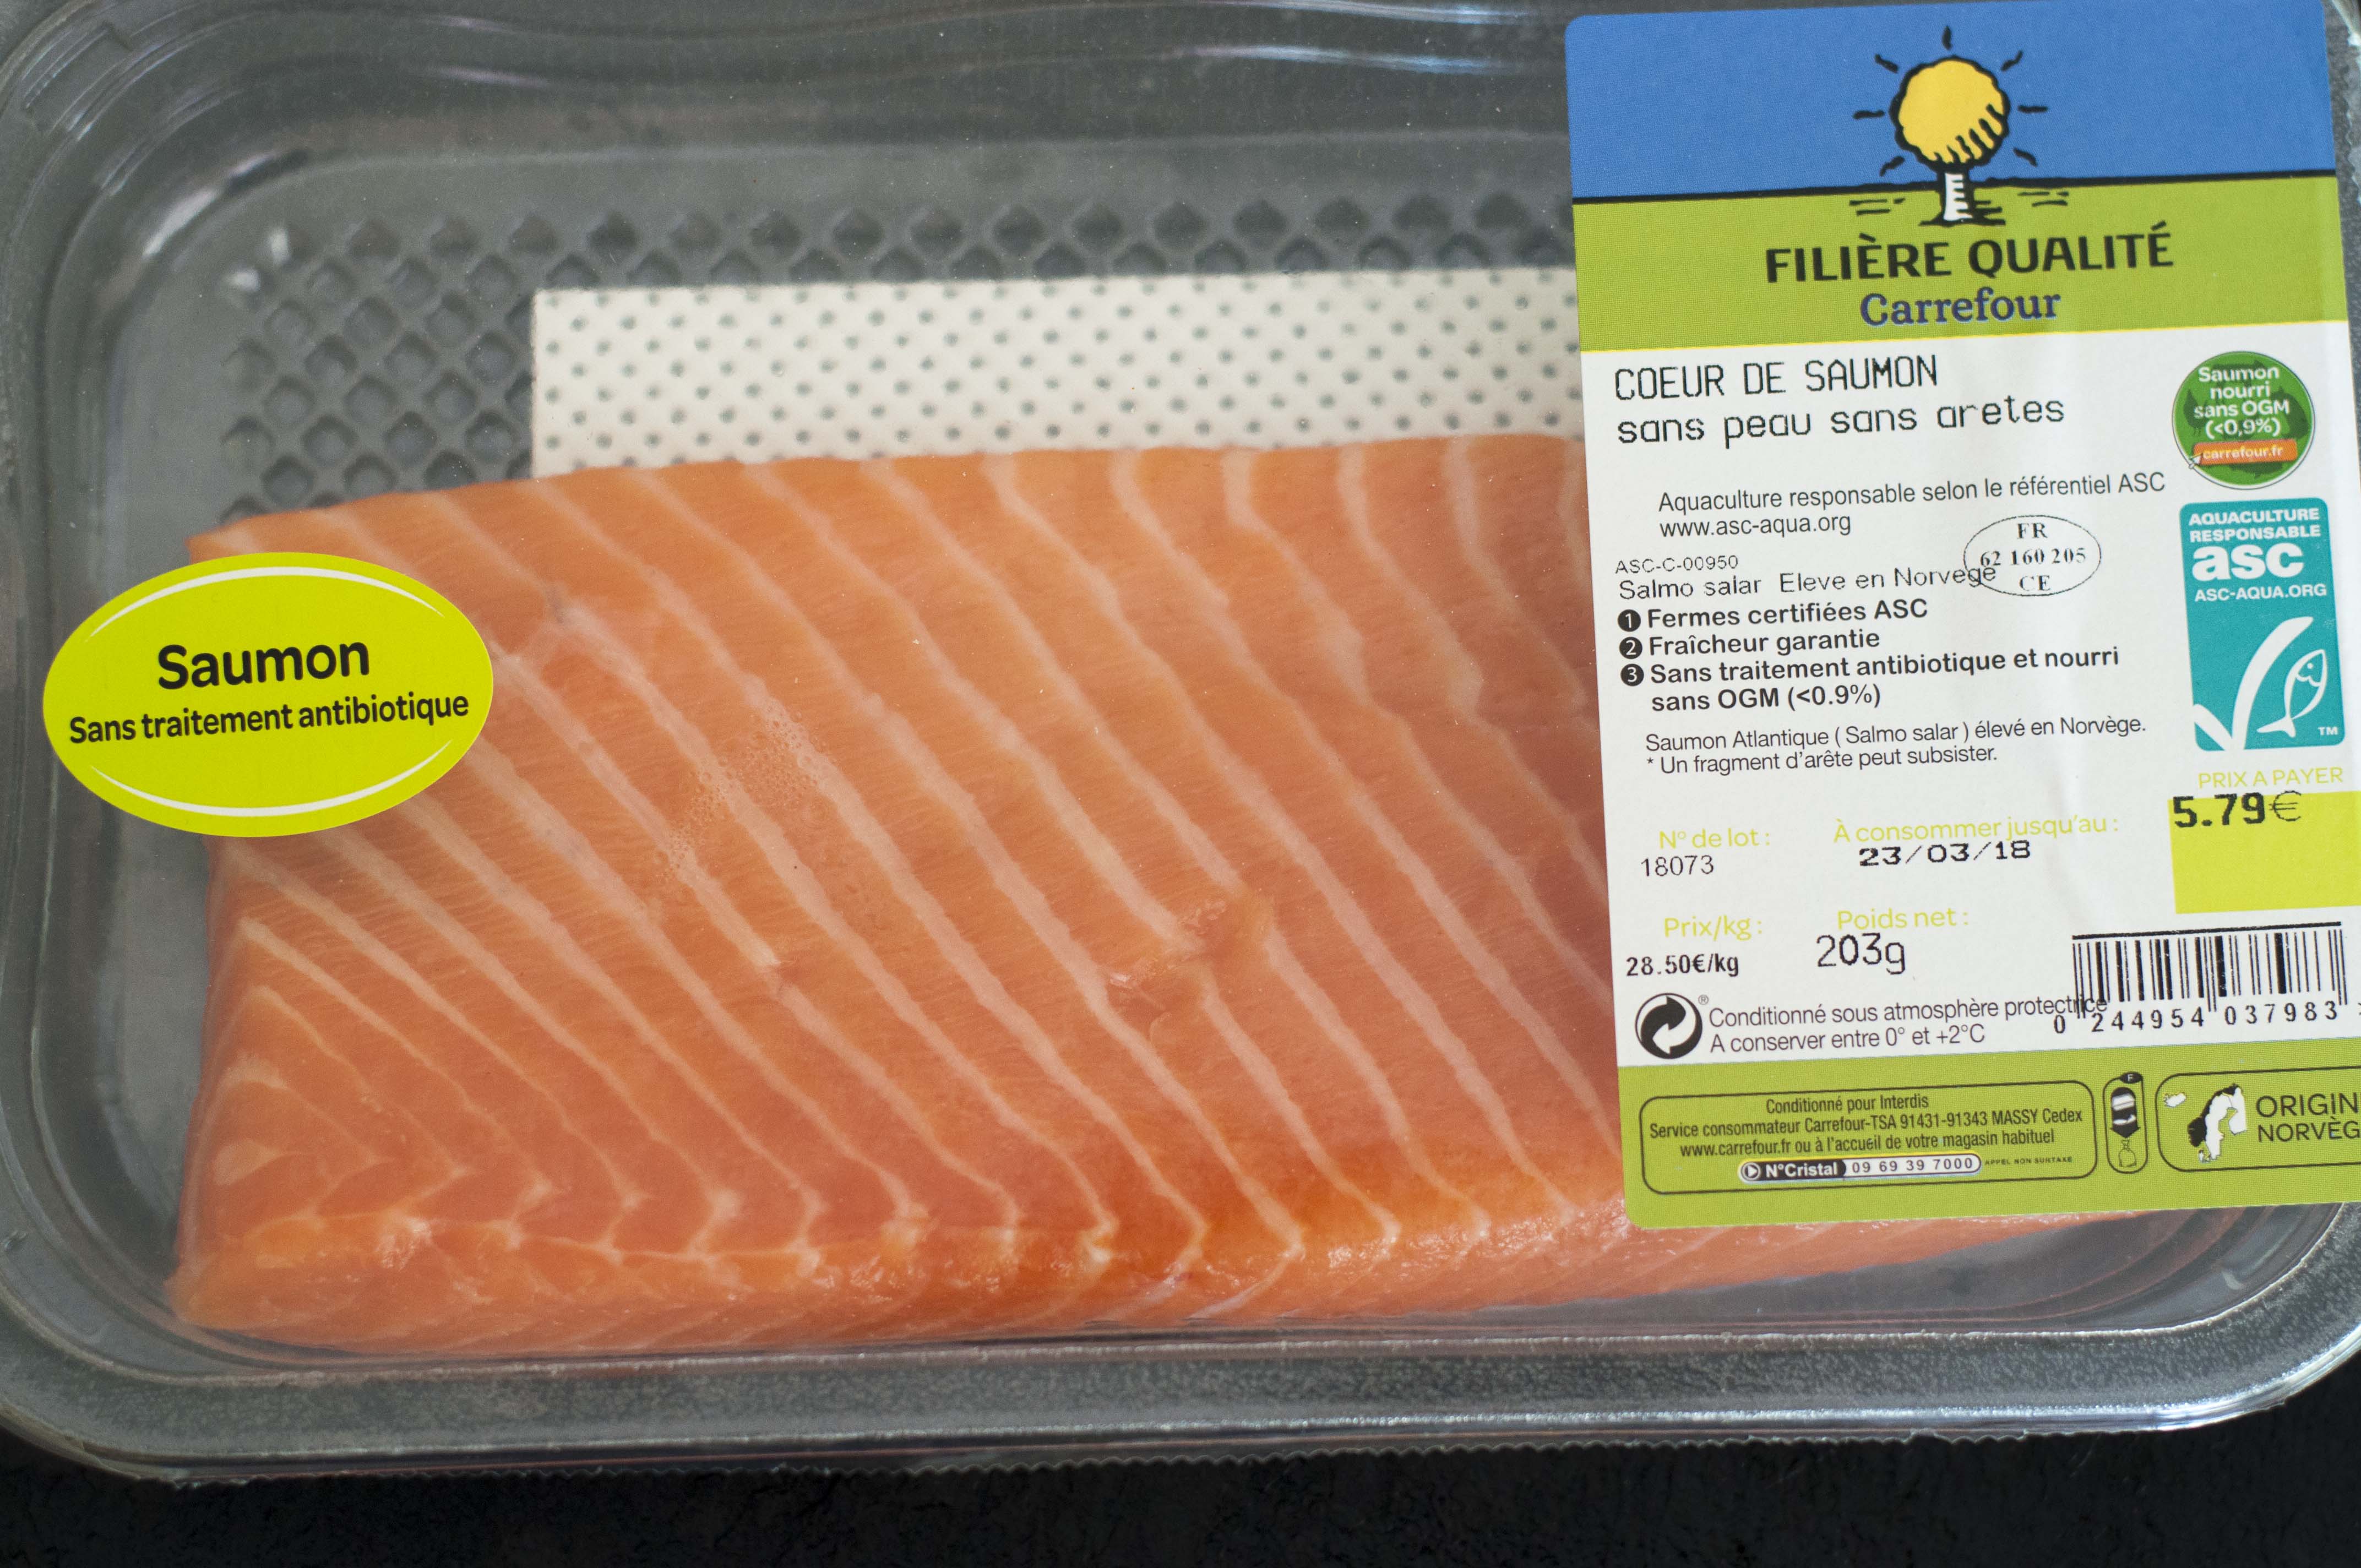
How to buy fish to make sushi
Ingredients are very important, especially if you use raw fish.
Make sure the salmon (or any other seafood you want to use) has been stored at -20 C for at least 7 days.
For additional information, you can find the recommendations from the FDA here.
To be safe, buy it from your favorite fishmonger and ask specifically if it is suitable for sushi.
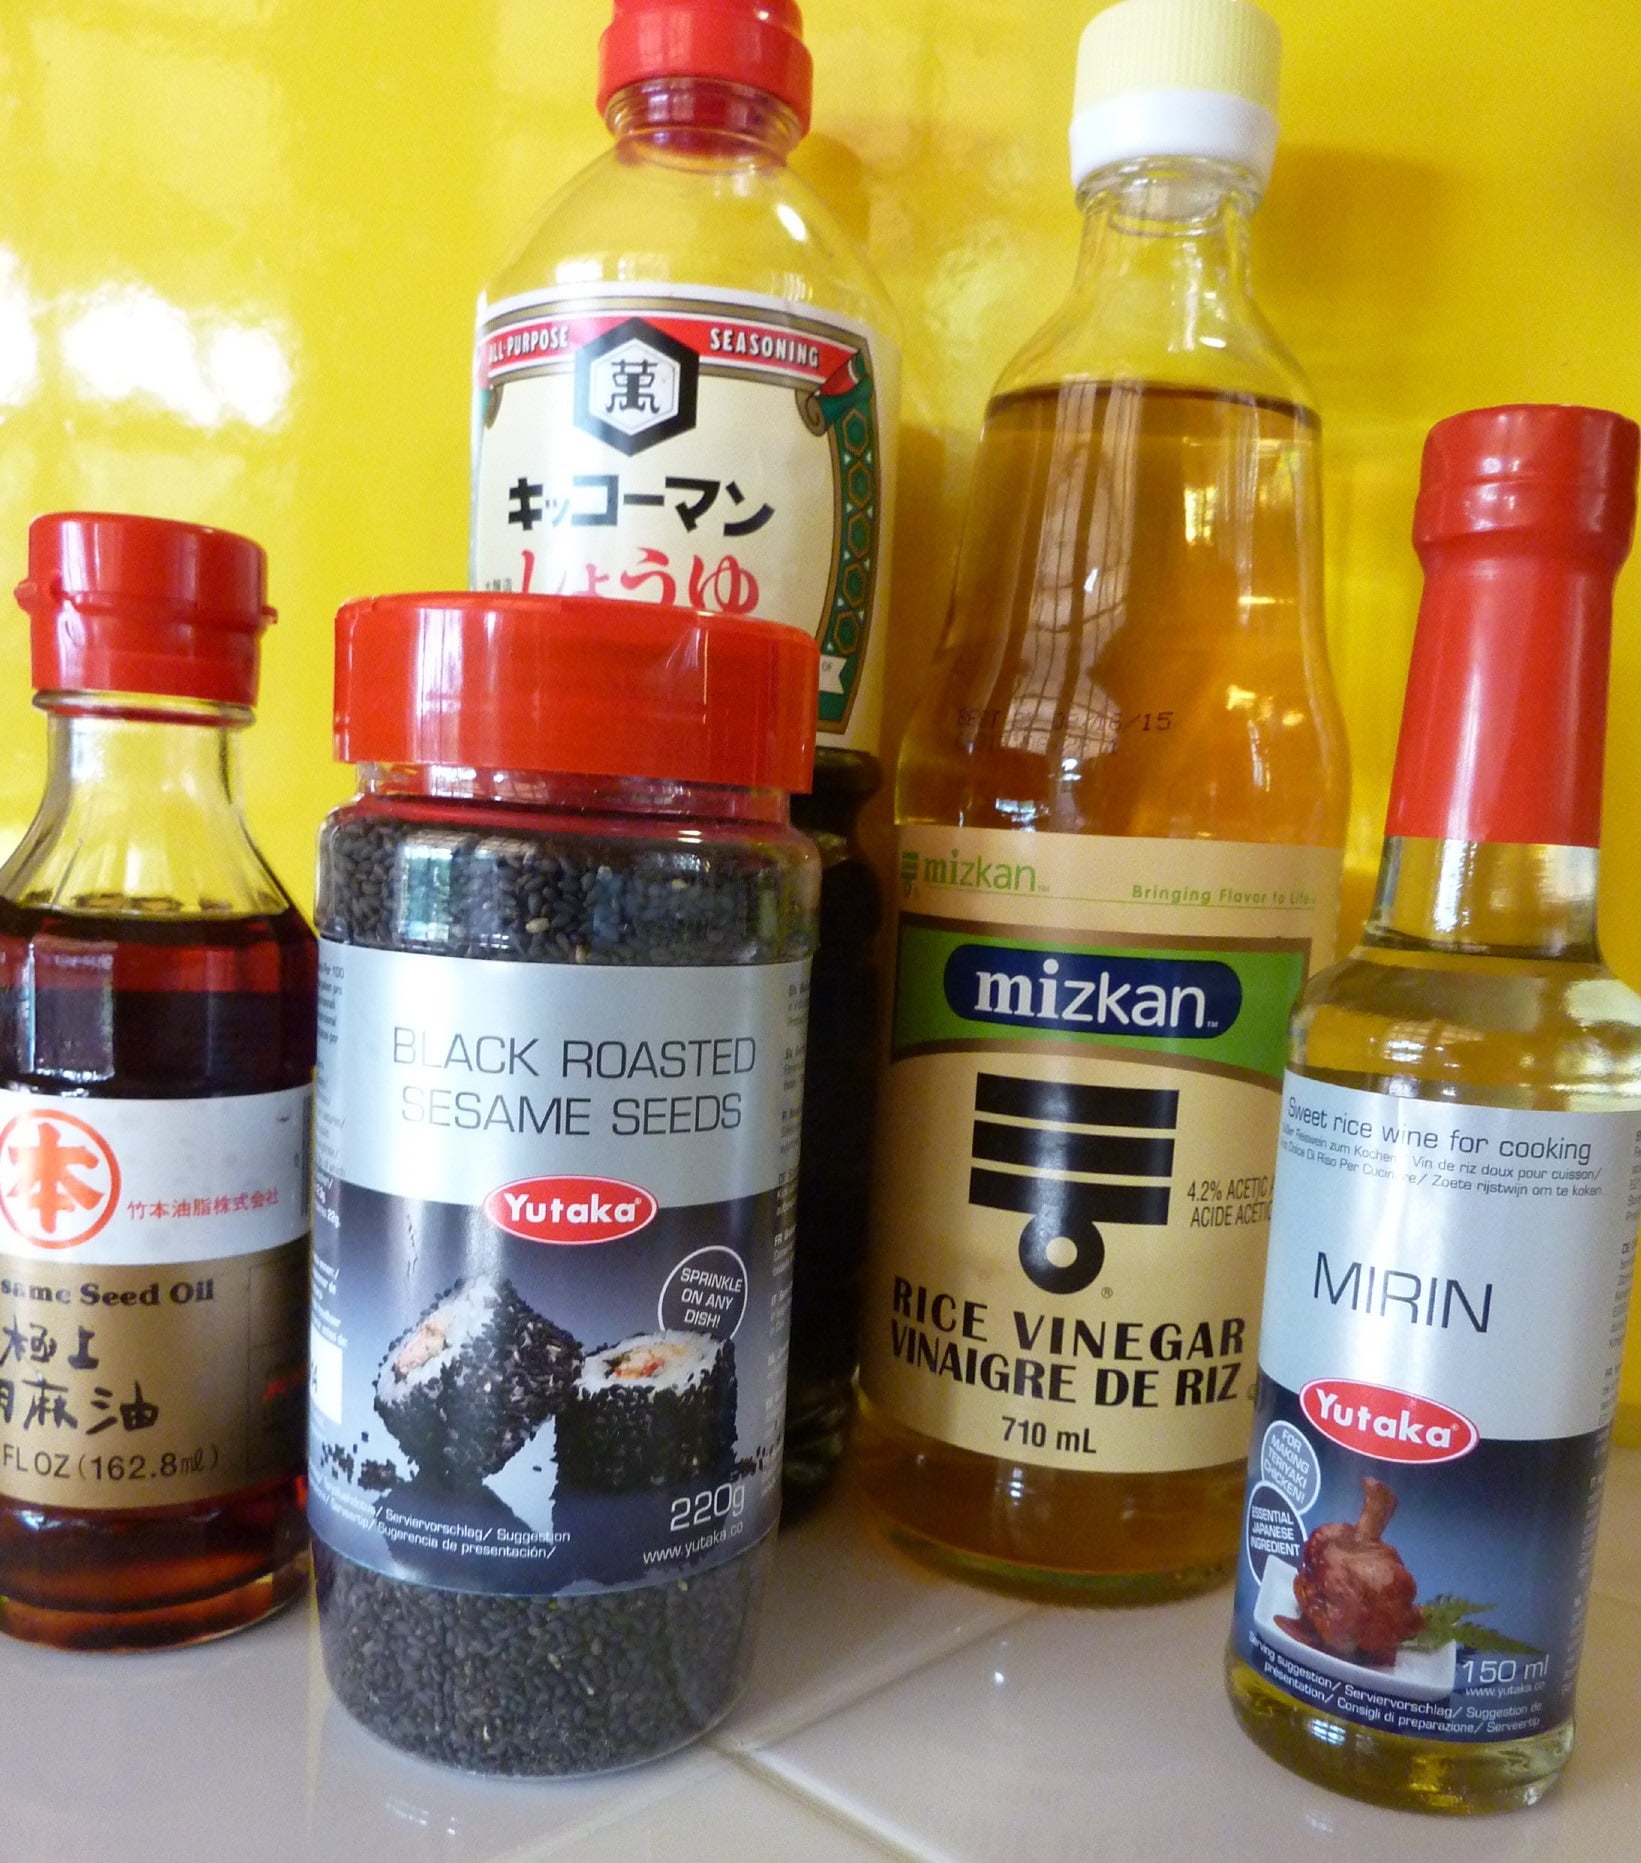
Ingredients to make Sushi Rice
Here is the list of the ingredients for the rice:
- 1x Sushi Rice
- 1x Nori Seaweeds
- 1x Sushi Rice Vinegar Seasoning
- 1x Soy Sauce
- 1x Wasabi Paste
- 1x White Sesame Seeds
- 1x Sushi Ginger
- Buy just once:
- 1x Bamboo Sushi Rolling Mat Kit
- 1x Patterned Wooden Chopsticks
Making the Sushi Rice
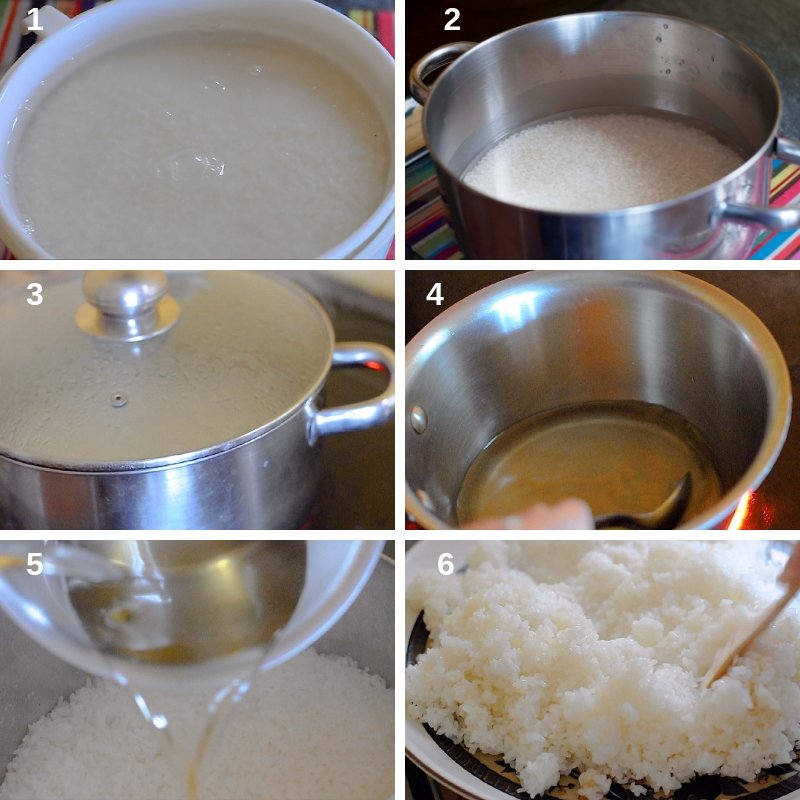
- Wash your sushi rice 2 to 3 times in freshwater
- Put the rice in a pan, add water (about 2 cm above the rice), and cover. There should be enough water to steam-boil, but not too much. If too little, the water evaporates completely, and the rice will burn.
- Boil for 5 minutes, Simmer for 12 minutes and Let it rest covered for 10 minutes. Do not open the pan while cooking, as the steam will evaporate.
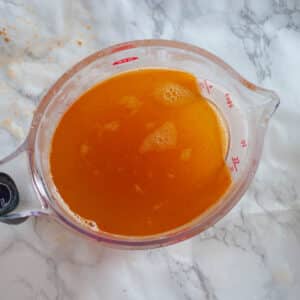
- In a small pan, heat up the rice vinegar to dissolve the sugar and the salt
- Add the syrup to the rice. Mix and let it cool down completely.
- Best if rested for ½ day in the fridge
Preparing the fillings
For the filling, I use:
- 10 ½ oz fresh salmon stored at -20 C for at least 7 days
- 1 avocado
- 1 scallion
- Wasabi paste
- 10 sheets Nori Seaweed
- ½ cup sesame seeds as needed
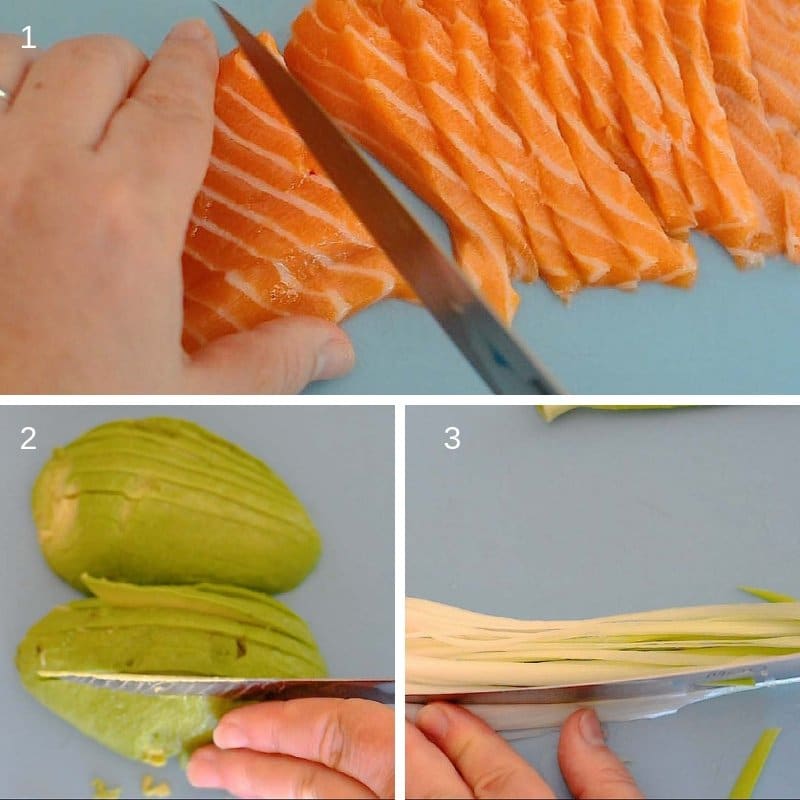
- Cut the salmon into small slices with a sharp knife
- Peel and slice the avocado
- and cut the scallion into strings
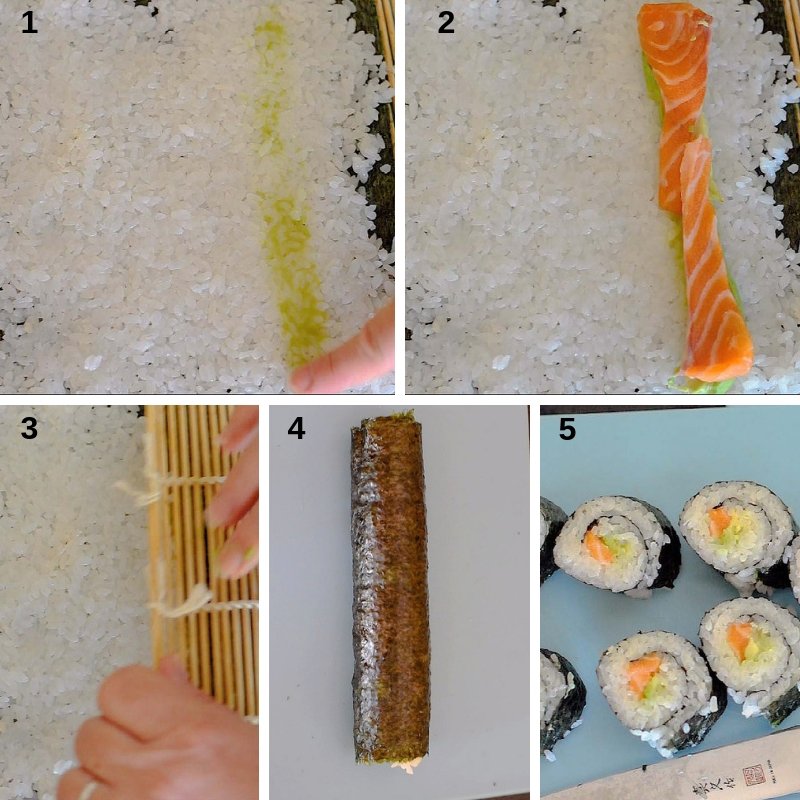
Making Maki Sushi Rolls
ASSEMBLE
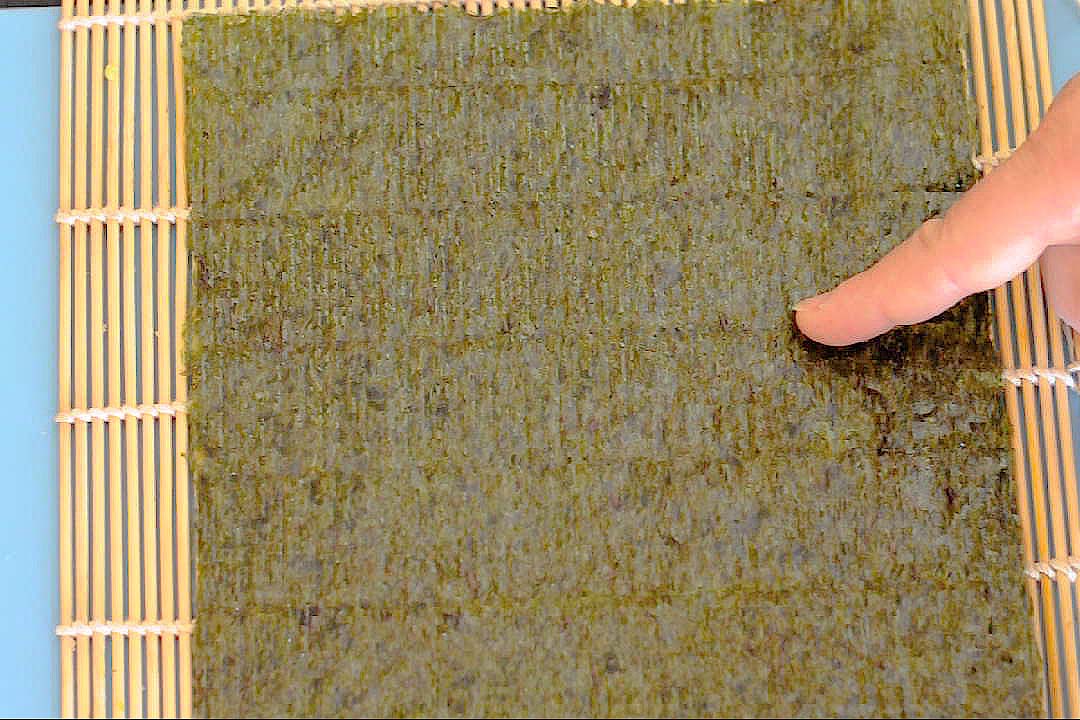
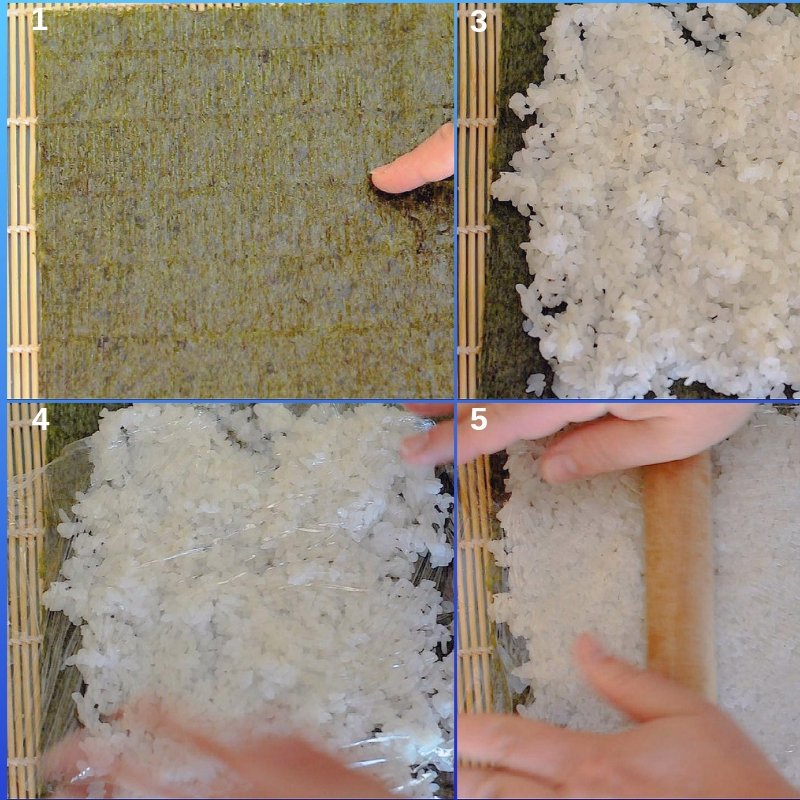
- Position your sushi mat and take your first sheet of Nori
- Shining part down and cut traces perpendicular to the mat sticks
- To spread the rice over the Nori, keep your hands wet, so the rice doesn't stick to your fingers
- To make a thin layer of rice, lay a cling film over the rice and
- roll it flat with a rolling pin
FILL IT & ROLL IT
- With your finger, spread some wasabi along the edge of the rice
- Lay over the wasabi line the salmon, the avocado and the scallion strings
- Starting from the side with the filling keeping it tight with the mat
- Lift the mat
- Slice with a VERY sharp knife
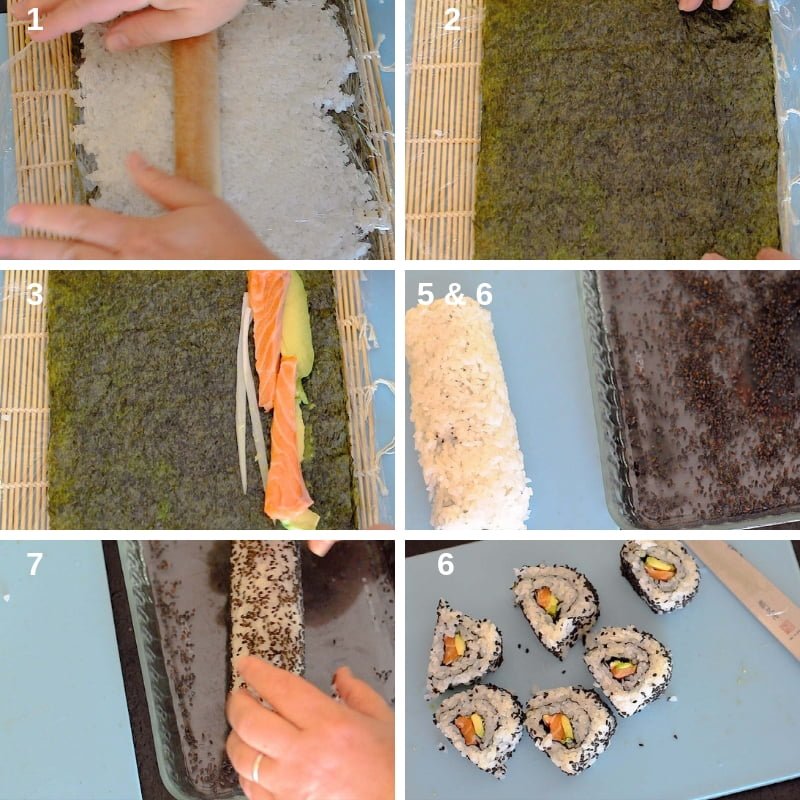
Making Uramaki Sushi
- Pick the next Nori sheet
- This time turn it upside-down
- Lay your filling over the Nori
- and roll
- remove the cling film
- Spread the sesame seeds over a tray
- and roll
- repeat - slice
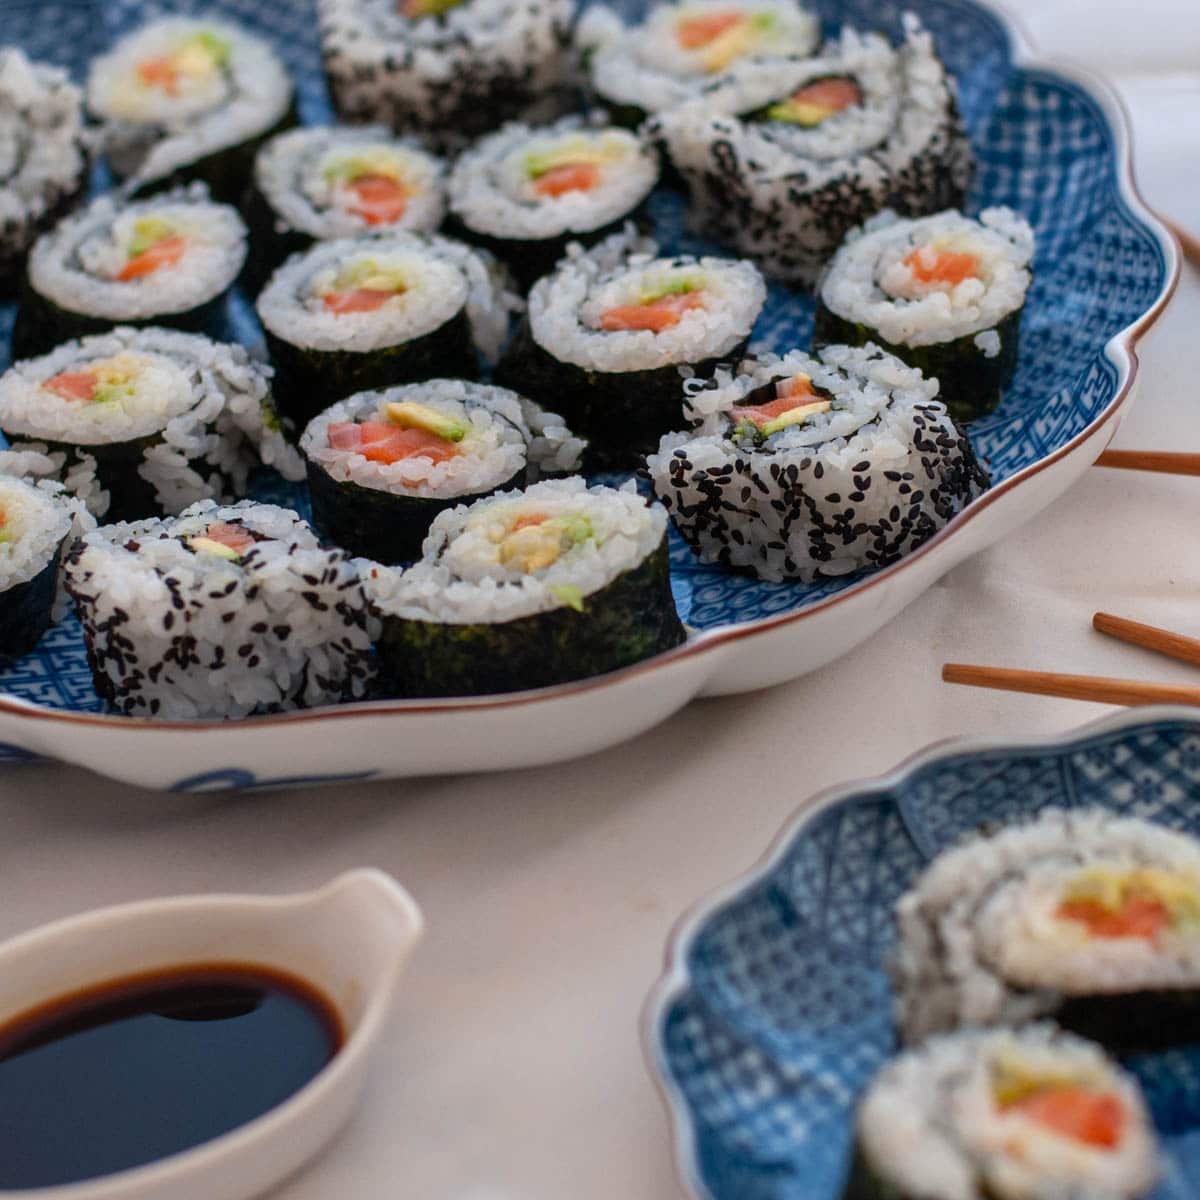
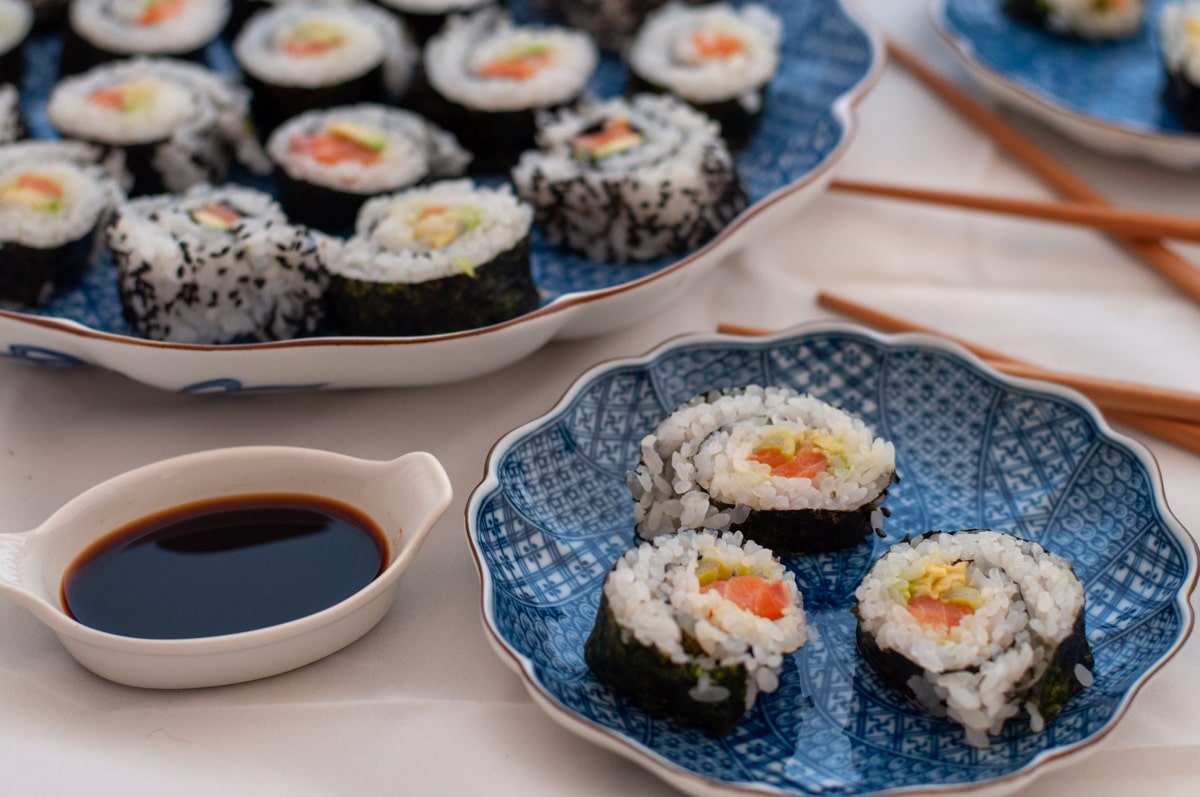
Enjoy homemade Sushi with plenty of salmon!
Tips for making the best Maki Uramaki Sushi Recipes
- The names: Maki is sushi rolled with the seaweeds outside, and Uramaki in Japanese means inside out, meaning the seaweed is inside the roll. Nigiri is made only with rice and fish, and Sashimi is fish only.
- Make sure the salmon (or any other seafood you want to use) has been stored at -20 C for at least 7 days.
- Add water (about 2 cm above the rice) and cover when you cook the rice. There should be enough water to steam-boil, but not too much. If too little, the water evaporates completely, and the rice will burn.
- Best if the rice rests for ½ day in the fridge
- When you position the Nori seaweeds over the sushi mat, make sure the shining part is down and cut traces perpendicular to the mat sticks
- To spread the rice over the Nori, keep your hands wet so the rice doesn't stick to your fingers
- To make a thin layer of rice, lay a cling film over the rice and roll it
- Use a VERY sharp knife to slice the sushi rolls
Recipes you might also like
If you are looking for more Seafood recipes, you can check the category:
Seafood
Also check the recipes below:
- Salmon Tartare Starter
- Baked salmon fillet in oven with steamed zucchini and potatoes
- Scallop, Shrimp, Salmon and Cod Fish Pie with a Mediterranean Twist
- Blini Russian Pancake with Salmon
- Smoked Salmon Farfalle Recipe
If you are making the Maki or Uramaki Sushi Recipes, leave your comment below I would like to hear from you. You can find more delicious ideas if you FOLLOW ME on Facebook, YouTube, Pinterest and Instagram or sign up to my newsletter.

📋Maki and Uramaki Sushi Rolls Recipe
Verified Culinary AuthorityVideo
Equipment
Ingredients
For the rice
- 3 cup Sushi rice
- 1 cup rice vinegar
- 5 tablespoon caster sugar
- 1 teaspoon salt
Filling
- 10 ½ oz fresh salmon stored at -20 C for at least 7 days
- 1 avocado
- 1 scallion
- Wasabi paste
- 10 sheets Nori Seaweed
- ½ cup sesame seeds as needed
To serve them with
Instructions
PREPARE THE RICE
- Wash your sushi rice 2 to 3 times in fresh water3 cup Sushi rice
- Put the rice in a pan, add water (about 2 cm above the rice) and cover. There should be enough water to steam boil, but not too much. If too little, the water evaporates completely, and the rice will burn.
- Boil for 5 minutes, Simmer for 12 minutes, Let it rest covered for 10 minutes. Do not open the pan while cooking as the steam will evaporate.
- In a small pan heat up the rice vinegar to dissolve the sugar and the salt1 cup rice vinegar, 5 tablespoon caster sugar, 1 teaspoon salt
- Add the syrup to the rice. Mix and let it cool down completely.
- Spread it on a dish or let it rest for ½ day in the fridge
PREPARE THE INGREDIENTS
- Cut the salmon in small slices with a sharp knife10 ½ oz fresh salmon
- Cut the avocado in slices1 avocado
- and the scallion in strings1 scallion
ASSEMBLE
- Position your sushi mat and take your first sheet of Nori10 sheets Nori Seaweed
- Shining part down and cut traces perpendicular to the mat sticks
- To spread the rice over the Nori keep your hands wet so the rice doesn't stick to your fingers
- To make a thin layer of rice, lay a cling film over the rice and
- roll it flat with a rolling pin
FILL IT
- With your finger, spread some wasabi along the edge of the riceWasabi paste
- Lay over the wasabi line the salmon, the avocado and the scallion strings
ROLL IT
- Starting from the side with the filling
- keeping it tight with the mat
- Lift the mat
- Slice with a VERY sharp knife
- Maki Sushi Rolls
MAKING: Uramaki Sushi
- Next Nori sheet
- This time turn it up-side down
- Lay your filling over the Nori
- and roll
- remove the cling film
- Spread the sesame seeds over a tray½ cup sesame seeds
- and roll
- and slice it
- Uramaki Sushi
- Enjoy a homemade Sushi with plenty of salmon. Serve with soya sauce and sushi gingersoy sauce, Sushi Ginger
Notes
- The names: Maki is sushi rolled with the seaweeds outside, and Uramaki in Japanese means inside out, meaning the seaweed is inside the roll. Nigiri is made only with rice and fish, and Sashimi is only the fish.
- Make sure the salmon (or any other seafood you want to use) has been stored at -20 C for at least 7 days.
- Add water (about 2 cm above the rice) and cover when you cook the rice. There should be enough water to steam-boil, but not too much. If too little, the water evaporates completely, and the rice will burn.
- Best if the rice rests for ½ day in the fridge
- When you position the Nori seaweeds over the sushi mat, make sure the shining part is down and cut traces perpendicular to the mat sticks
- To spread the rice over the Nori, keep your hands wet, so the rice doesn't stick to your fingers
- To make a thin layer of rice, lay a cling film over the rice and roll it
- Use a VERY sharp knife to slice the sushi rolls


Patty
Awesome post Laura! Thanks for sharing, I feel like I could make beautiful sushis now!
Kristina @ Love & Zest
I need to make this asap! I love you broke it down!
Laura
Thank you Kristina, hope you will enjoy. The homemade is so much better
Kelly @ trial and eater
I've tried this without the rolling sheet before and it's a mess! Great tutorial!
Laura
thank you, the sheet really helps
Michelle Frank | Flipped-Out Food
I have always wondered what distinguished "maki" from "uramaki", but was too lazy to find out, haha! I've always found the idea of making sushi somewhat daunting, but your photo breakdown and helpful video simplify it so much that I'm pretty sure that I'll give this a whirl in the near future!
Laura
Thank you Michelle, I am glad it is helpful
Vicky @ Avocado Pesto
Love love love Japanese food and anything related to it. Sushi rolls I am always down for! YUM!
Laura
Yes Vicky, me too
Kathryn @ FoodieGirlChicago
I love making sushi at home!
Elaine @ Dishes Delish
Laura, I haven't tried to make sushi yet. But this post has given me the courage to do it! Your recipe looks fabulous!! I can't wait to try it!
jayino
Thanks for your good website and information !
Laura
You are very welcome