
Porchetta Romana is classic street food from Rome. It is sliced and served in a crunchy bread roll. This dish features a deboned pig (or a large section of it) that's rubbed with a mix of garlic, rosemary, fennel, salt, and pepper. It's then carefully rolled and tied before being slow-roasted until the meat is tender, deeply flavorful, and incredibly juicy, all while developing a layer of crispy, crackling skin. Fortunately, you don't need to roast a whole pig to enjoy it; learn how you can make a version at home with this recipe.

Jump to:
Life was different before the first McDonald's opened in Rome in Piazza di Spagna.
As teenagers growing up in Rome in the 70's, we wouldn't crave the BigMac.
Our Vespa's gatherings were organized around Porchetta Romana Food Stalls and the Grattachecca Kiosk, serving crushed ice with fresh fruits.
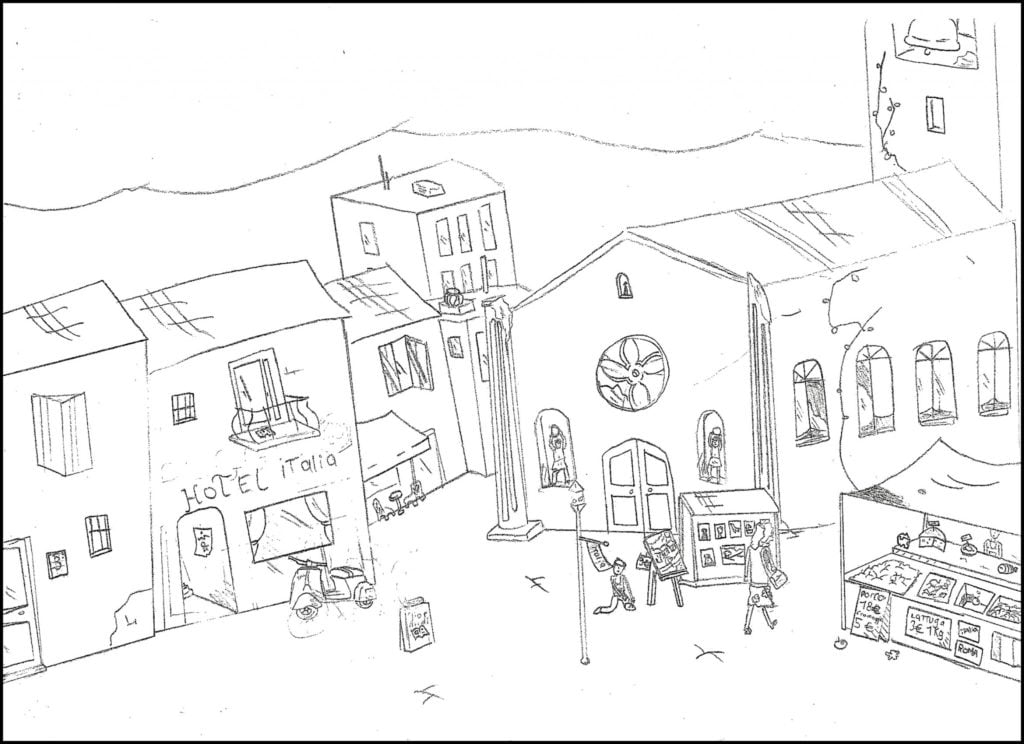
Rome by 9yrs Francesco Tobin from the series: Villages 2016
What is Porchetta Romana
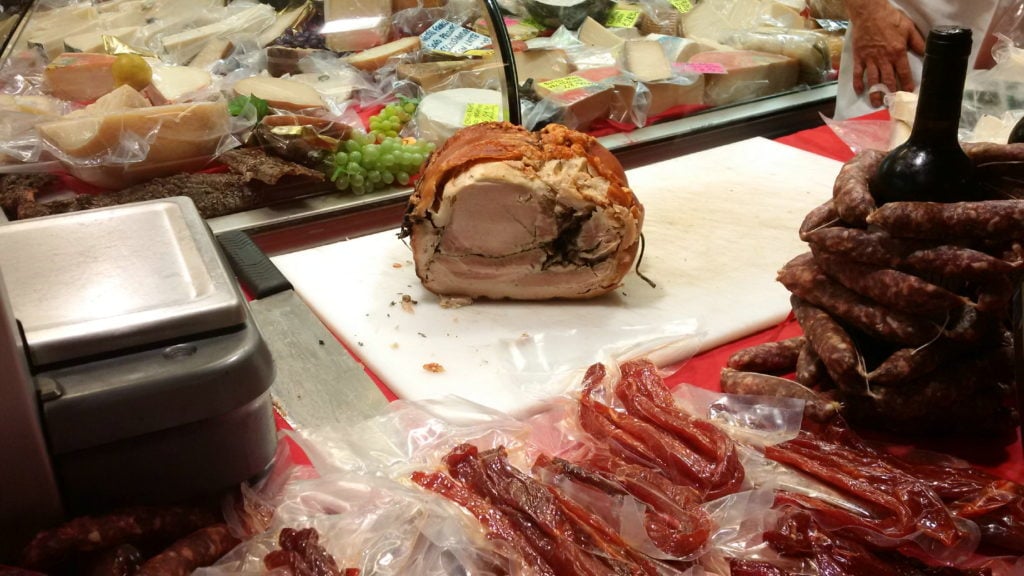
Porchetta Romana is a large cut of pork (almost half), wrapped in its rind and flavoured with herbs. It was cooked on a wooden fire, cut into slices, and served in a crusty Panino/Rosetta.
Usually sold in busy streets, markets and outside the football stadium, it was the food to have at every street food festival.
The most famous La Sagra dei Castelli Romani!
Which cut of meat to use
If you want to make a Porchetta Romana at home, you cannot cook the same huge cut traditionally used in Rome.
Traditionally, Porchetta Romana uses a whole, deboned pig, not practical for most home kitchens.
This recipe adapts this by using a clever combination of two specific pork cuts to achieve that glorious contrast of succulent meat and crispy, rendered skin: Pork Belly and Pork Tenderloin.
- Pork Belly: This is the star for achieving the signature crispy skin (crackling) and rich, flavorful fat. We'll use a sizable piece of fresh pork belly, which will be scored and seasoned, then wrapped around the tenderloin. As it roasts, the fat from the belly will render, basting the leaner tenderloin inside and crisping up beautifully on the outside.
- Pork Tenderloin: Nestled inside the pork belly, the tenderloin provides a core of lean, incredibly tender meat. It benefits wonderfully from the self-basting action of the surrounding pork belly, remaining moist and absorbing the aromatic seasonings.

Pork Belly vs. Bacon - Why Fresh Pork Belly is Key
It's crucial to use fresh pork belly for this recipe, not bacon.
While they come from the same part of the pig, they are very different products:
Pork Belly:
- What it is: Pork belly is the uncured, unsmoked, and un-sliced slab of meat from the underside or "belly" of the pig.
- Characteristics: It's rich in fat, with layers of meat and fat. It's a raw, fresh cut.
- Flavor Profile: It has a clean, pure pork flavor. This makes it a perfect canvas for the herbs and spices we'll be using in our porchetta rub.
- Use in this recipe: Its neutral flavor to absorb our seasonings and its high fat content to render and create crispy crackling.
Bacon:
- What it is: Bacon starts as pork belly, but it then undergoes a preservation process.
- Characteristics: It is pork belly that has been cured (treated with salt, sugar, and often nitrates/nitrites) and usually smoked. It is then typically sold sliced.
- Flavor Profile: Bacon has a distinctively salty, smoky, and sometimes sweet flavor due to the curing and smoking process.
- Why not for this recipe: If you were to use bacon, its pre-existing strong cured and smoky flavors would overpower the traditional porchetta seasonings (garlic, rosemary, fennel).
Furthermore, the curing process changes the meat's texture and how it cooks; it wouldn't render and crisp in the same way needed for porchetta crackling, and it would likely be far too salty when combined with our own seasoning.
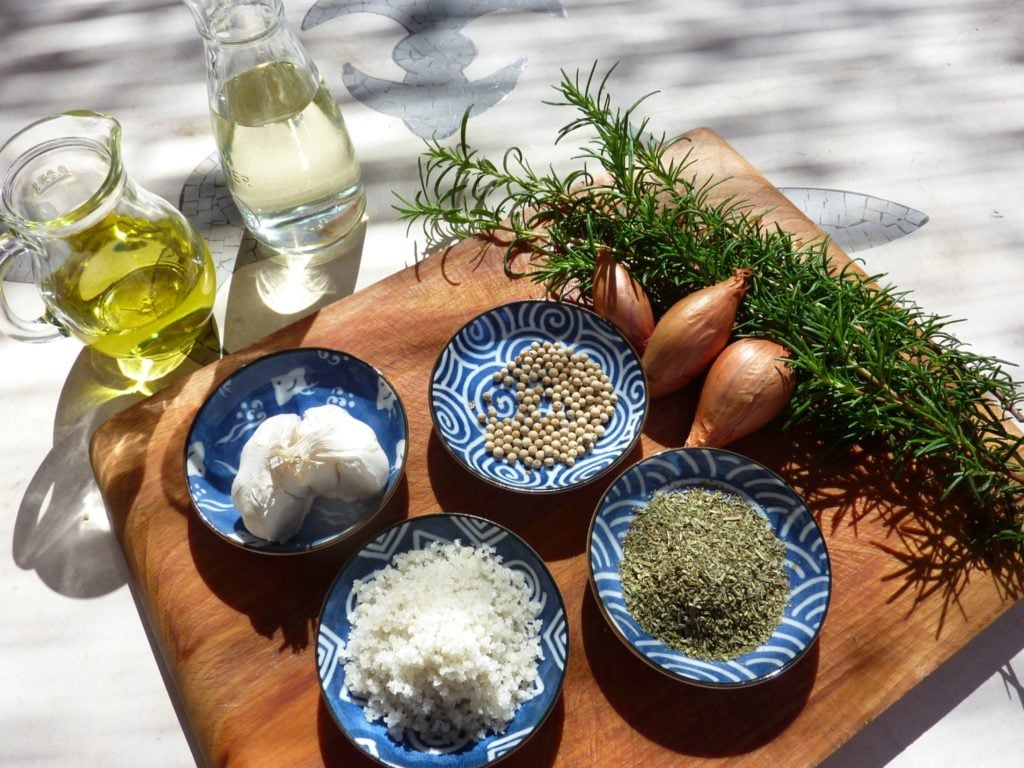
Ingredients for the seasoning
- Garlic: A foundational aromatic, providing a pungent, savory depth that infuses both the pork belly and the tenderloin, complementing the richness of the fat and the mildness of the lean meat.
- Fennel Pollen or Ground Fennel Seed: The signature spice of porchetta, offering sweet, slightly anise-like aromatic notes that pair exceptionally well with pork. It cuts through the richness and adds a unique, bright complexity.
- Fresh Rosemary: Brings a robust, piney, and slightly peppery aromatic quality. Its strong flavor stands up well to the richness of the pork and the long roasting time, infusing the meat with a classic Mediterranean fragrance and taste.
- Good Quality Olive Oil: In the rub, it acts as a binder, helping the salt, pepper, and herbs adhere to the pork. It also adds a touch of fruity richness and moisture and can aid in the browning and crisping of the pork belly skin.
- Dry White Wine: Used for basting, it adds moisture to the cooking environment, preventing the tenderloin from drying out. Its acidity helps cut through the richness of the pork belly fat, balancing flavors. As it evaporates, it leaves behind a subtle fruity complexity.
- Salt and pepper
6 or 8 crusty Italian sandwich rolls
Measurements are in the recipe card
Special Tools Needed
While many kitchen staples will be used, a few specific tools can make the process of preparing and cooking your porchetta smoother and more successful:
- Herb Mixer/Spice Blender/Small Food Processor: Essential for finely mincing the fresh herbs and garlic with the spices to create a well-incorporated and potent rub.
- Kitchen Twine: Crucial for securely tying the rolled porchetta, helping it maintain its shape during cooking and ensuring even cooking.
- Meat Thermometer: Highly recommended for accurately checking the internal temperature of both the pork tenderloin and the pork belly, ensuring the meat is cooked safely and perfectly without overcooking. An instant-read thermometer is ideal.
- Baster (e.g., Cooking & Basting, Detachable Round Bulb type): Useful for easily collecting and distributing the white wine and pan juices over the porchetta during the basting process, helping to keep it moist and flavorful.

Instructions with images
Create the Herb & Spice Rub:

- Remove the fresh rosemary leaves from their stems and peel the garlic cloves.

- In a spice blender or small food processor, combine the rosemary leaves, garlic cloves, fennel pollen (or ground fennel seeds), and ground white pepper.
NOTE: As I do not like fennel, in this recipe I used Thyme instead

- Blend until all ingredients are finely minced and well combined, forming a fragrant, slightly moist mixture.

- Transfer this blended herb and spice mixture to a bowl. Add your kosher salt to the bowl and mix thoroughly. This is your herb rub.
Prepare the Pork Belly:

- Lay the pork belly skin-side down on your work surface.

- With a sharp knife, carefully cut the pork belly lengthwise through the meat, stopping before you cut all the way through one of the long edges. Open it up like a book to create one long, flat base of meat.
Season and Assemble:

- Spread the prepared herb rub evenly and generously over the entire meat side (the opened-up surface) of the pork belly.

- Place the pork tenderloin along one of the longer edges of the herb-rubbed pork belly.
- Carefully and tightly roll the pork belly around the tenderloin, encasing it completely, to form a compact cylindrical log. The skin should be on the outside.
Tie the Porchetta:

- Using kitchen twine, tie the rolled porchetta securely at 1 to 1.5-inch intervals along its length.

- Start from one end and work your way to the other, ensuring the roll is tight and will hold its shape during cooking.

- You can also run a piece of twine lengthwise and loop it under the crosswise ties for extra security.

- Rub additional kosher salt onto the exterior skin at this stage.
Optional, but recommended: ensure the skin is very dry and well-salted is key for crisping.
Cooking
- Preheat your oven to a high temperature: 240-250°C (465-480°F).
- Lightly grease a roasting pan with a thin layer of olive oil
Note: If you've refrigerated the tied porchetta after preparing it, let it sit at room temperature for about 30-60 minutes before cooking.

- Place the tied porchetta into the prepared roasting pan, skin facing upward
- Roast at a high temperature (240-250°C / 465-480°F) for 20-30 minutes.
Note: This initial blast of heat is crucial for starting the fat rendering process and helping the pork belly skin to begin crisping. Keep an eye on it to ensure it doesn't burn.

- After the initial high-heat roast, carefully remove the roasting pan from the oven.

- Turn it around and pour the white wine over the porchetta.
- Reduce the oven temperature to 175-180°C (350°F).
- Return the porchetta to the oven.

- Continue to roast at the lower temperature, basting the white wine juices from the pan every 25-30 minutes.

- Start checking the internal temperature after about 45 minutes at the lower heat. Insert an instant-read meat thermometer into the very center of the pork tenderloin.
Note: The total roasting time after reducing the heat will vary depending on the thickness of your porchetta, but anticipate approximately 1 hour to 1 hour 30 minutes.
- You are aiming for an internal temperature of 63-65°C (145-150°F) for a juicy and safely cooked tenderloin. The pork belly should also be tender.
Resting

- Once the porchetta is cooked and the skin is satisfactorily crispy, remove form the oven

- Cover it loosely with aluminum foil. Do not wrap it tightly, as this will steam the skin and make it lose its crispness.
- Let it rest for at least 15-20 minutes. This allows the muscle fibers to relax and the juices to redistribute throughout the meat, resulting in a much more tender and flavorful porchetta.
Serving
- Carefully remove and discard all the kitchen twine.
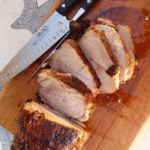
- Using your meat slicer is ideal for achieving the desired thinness. Set it to produce thin slices, similar to how you would slice cured ham but perhaps just a fraction thicker, aiming for slices approximately 2-4 mm thick (roughly 1/16 to just over ⅛ inch).
- If you don't have a meat slicer, use a very sharp carving knife or a serrated knife (which can be helpful for cutting through the crispy skin). Aim for the thinnest slices you can manage; they may naturally be a bit thicker than with a slicer, and that's perfectly fine. The goal is still to have manageable, flavorful pieces.
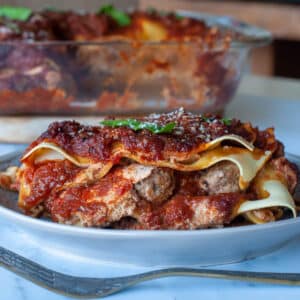
- It can be served warm or at room temperature. For an extra layer of flavor and moisture, pour over some of the rich juices left in the roasting pan.

How to serve it
Porchetta is versatile and delicious served warm or at room temperature. Traditionally, as street food, it's piled into a crusty Italian bread roll, often a Roman Rosetta.
For extra flavor, skim the fat from the pan drippings and drizzle the remaining jus over the sliced meat or serve it on the side for dipping.
Beyond sandwiches, porchetta can be a roasted meat main course with sides like roasted potatoes and stir-fried vegetables.
As porchetta can be served at room temperature, it is an excellent choice for buffet parties, picnics, or any gathering where guests can help themselves.
Leftover porchetta should be cooled completely, then stored in an airtight container or wrapped tightly in the refrigerator for up to 3-4 days.

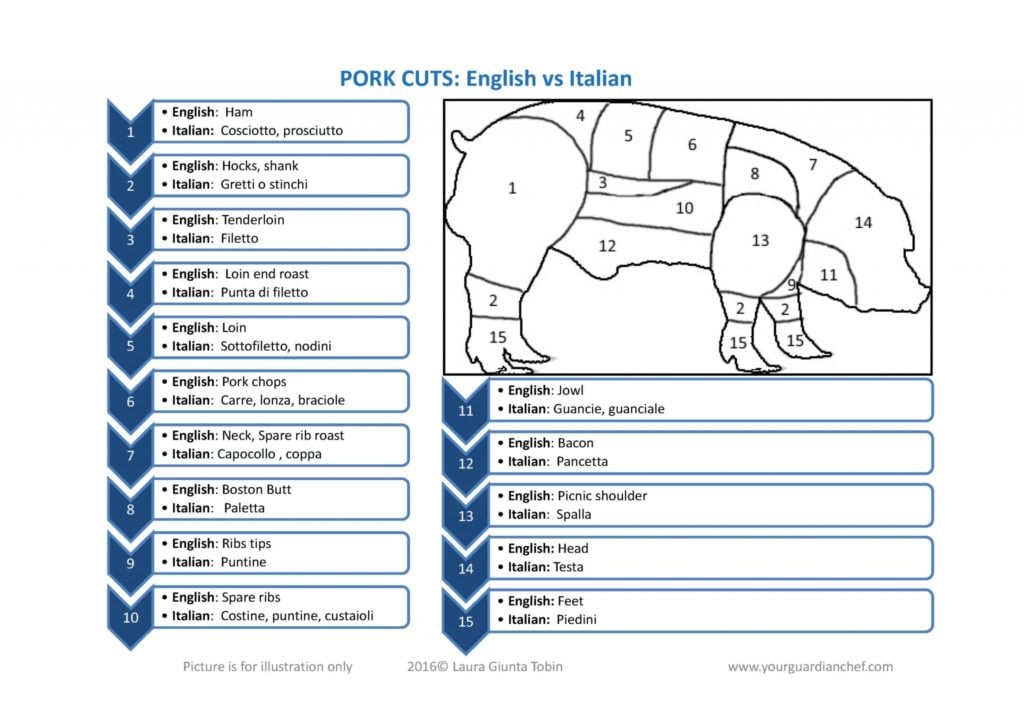
Found out more about pork cuts and how to cook them
To find out more about pork cuts, their name in French and Italian and how to cook them you can read the article: Pork Cuts Names And How to Cook Them
Recipes you might also like
- Pulled Pork Pressure Cooker
- Pork Casserole with Pineapple or whatever
- Traditional Cassoulet Recipe
- Magret de Canard à l'Orange Recipe
- Stuffed Pork Tenderloin with Chestnuts and Cranberries
- Wild Boar with Chocolate Sauce
- Homemade Roast Beef
If you are making the Porchetta Romana, leave your comment below I would like to hear from you. You can find more delicious ideas if you FOLLOW ME on Facebook, YouTube, Pinterest and Instagram or sign up to my newsletter.

📋 Porchetta Romana Recipe
Verified Culinary AuthorityVideo
Equipment
Ingredients
- 4 lb pork belly and pork tenderloin
- 3 peeled garlic cloves
- 2 shallots minced
- 1 sprig fresh chives chopped (optional)
- 1 tablespoon fennel pollen alternatively fennel seed ground in a spice grinder
- 2 sprig fresh rosemary leaves finely chopped
- 1 cup olive oil
- 1 cup dry white wine (for basting)
- 1 fistful kosher salt
- White pepper
- 8 crusty Italian sandwich rolls
Instructions
Create the Herb & Spice Rub
- Remove the fresh rosemary leaves from their stems and peel the garlic cloves.
- In a spice blender or small food processor, combine the rosemary leaves, garlic cloves, fennel pollen (or ground fennel seeds), and ground white pepper.
- Blend until all ingredients are finely minced and well combined, forming a fragrant, slightly moist mixture.
- Transfer this blended herb and spice mixture to a bowl. Add your kosher salt to the bowl and mix thoroughly. This is your herb rub.
Prepare the Pork Belly
- Lay the pork belly skin-side down on your work surface.
- With a sharp knife, carefully cut the pork belly lengthwise through the meat, stopping before you cut all the way through one of the long edges. Open it up like a book to create one long, flat base of meat.
Season and Assemble
- Spread the prepared herb rub evenly and generously over the entire meat side (the opened-up surface) of the pork belly.
- Place the pork tenderloin along one of the longer edges of the herb-rubbed pork belly.
- Carefully and tightly roll the pork belly around the tenderloin, encasing it completely, to form a compact cylindrical log. The skin should be on the outside.
Tie the Porchetta
- Using kitchen twine, tie the rolled porchetta securely at 1 to 1.5-inch intervals along its length.
- Start from one end and work your way to the other, ensuring the roll is tight and will hold its shape during cooking.
- You can also run a piece of twine lengthwise and loop it under the crosswise ties for extra security.
- Rub additional kosher salt onto the exterior skin at this stage.
Cooking
- Preheat your oven to a high temperature: 240-250°C (465-480°F).
- Lightly grease a roasting pan with a thin layer of olive oil
- Place the tied porchetta into the prepared roasting pan, skin facing upward
- Roast at a high temperature (240-250°C / 465-480°F) for 20-30 minutes.
- After the initial high-heat roast, carefully remove the roasting pan from the oven.
- Turn it around and pour the white wine over the porchetta.
- Reduce the oven temperature to 175-180°C (350°F).
- Return the porchetta to the oven.
- Continue to roast at the lower temperature, basting the white wine juices from the pan every 25-30 minutes.
- Start checking the internal temperature after about 45 minutes at the lower heat. Insert an instant-read meat thermometer into the very center of the pork tenderloin.
- You are aiming for an internal temperature of 63-65°C (145-150°F) for a juicy and safely cooked tenderloin. The pork belly should also be tender.
Resting
- Once the porchetta is cooked and the skin is satisfactorily crispy, remove form the oven
- Cover it loosely with aluminum foil. Do not wrap it tightly, as this will steam the skin and make it lose its crispness.
- Let it rest for at least 15-20 minutes. This allows the muscle fibers to relax and the juices to redistribute throughout the meat, resulting in a much more tender and flavorful porchetta.
Serving
- Carefully remove and discard all the kitchen twine.
- Using your meat slicer is ideal for achieving the desired thinness. Set it to produce thin slices, similar to how you would slice cured ham but perhaps just a fraction thicker, aiming for slices approximately 2-4 mm thick (roughly 1/16 to just over ⅛ inch).
- If you don't have a meat slicer, use a very sharp carving knife or a serrated knife (which can be helpful for cutting through the crispy skin). Aim for the thinnest slices you can manage; they may naturally be a bit thicker than with a slicer, and that's perfectly fine. The goal is still to have manageable, flavorful pieces.
- It can be served warm or at room temperature. For an extra layer of flavor and moisture, pour over some of the rich juices left in the roasting pan
Notes
- As I do not like fennel, in this recipe I used Thyme instead. For a customized experience, feel free to use herbs and spices you like
- Optional, but recommended: ensure the skin is very dry and well-salted is key for crisping.
- If you've refrigerated the tied porchetta after preparing it, let it sit at room temperature for about 30-60 minutes before cooking.
- This initial blast of heat is crucial for starting the fat rendering process and helping the pork belly skin to begin crisping. Keep an eye on it to ensure it doesn't burn.
- The total roasting time after reducing the heat will vary depending on the thickness of your porchetta, but anticipate approximately 1 hour to 1 hour 30 minutes for 4lb - 2 kg of meat
Serena
This sounds delicious! Thanks for sharing
Laura
you are welcome
Ginny
You've taught me a lot today. I've never heard of Panino/Rosetta so thanks so much.
Laura
You are very welcome Ginny
Mabintu
Yum, what a delicious sounding dish! Sounds like it would be perfect for a tasty lunch
Laura
Thanks, it is indeed
Mel
Thanks for sharing such a great, flavoursome recipe. I love a large piece of meat to roast with simple ingredients for a meal that pleases the whole family!
Laura
Thanks, I do too. And seeing their big smile
Cliona Keane
This is such a yummy recipe! I adore pork so will be giving this a go soon!
Laura
thank you
Christina Shoemaker
You had me at rosemary and white wine! Two of my favorites on everything!!
Laura
True, they are good on everthing
Giulio Romani
Obviously, you have an American style porchetta! The real one (the Porchetta Romana, that from Ariccia and the Castelli Romani), is SOLELY stuffed with the “Regaglie del maiale”.(the liver, hart, kidneys), garlic, fresh rosemary salt and pepper. Nothing else, of the spices you list go there. Try it my way and you’ll not be disappointed.
Laura
Hi Gulio, it is an American version as I wanted it to make it easy for my audience who is mainly American. Thank you for your contribution, I use to eat it all the time when I was in Rome as I had close friends in Albano Laziale. We used to go to the Marino sagra del vino every year. The best Porchetta!
Bertha Drayson
Sounds absolutely d
Laura
Thank you, I was just finishging updating the post, I hope you can check it out again with much more information and new images. A video will be published by the end of the week.
Nan G
I am making this tomorrow.
Do the shallots go into the herb mixture?
I'm assuming they do.
Laura
Yes, they do
Nan G
Best pork roast I've ever made!
Thanks for this recipe.
Will do this one again.
Laura
I am happy you like it. Thank you for letting me know. I really appreciate it